Sunday, 15 March 2015

Clarity Challenge 25

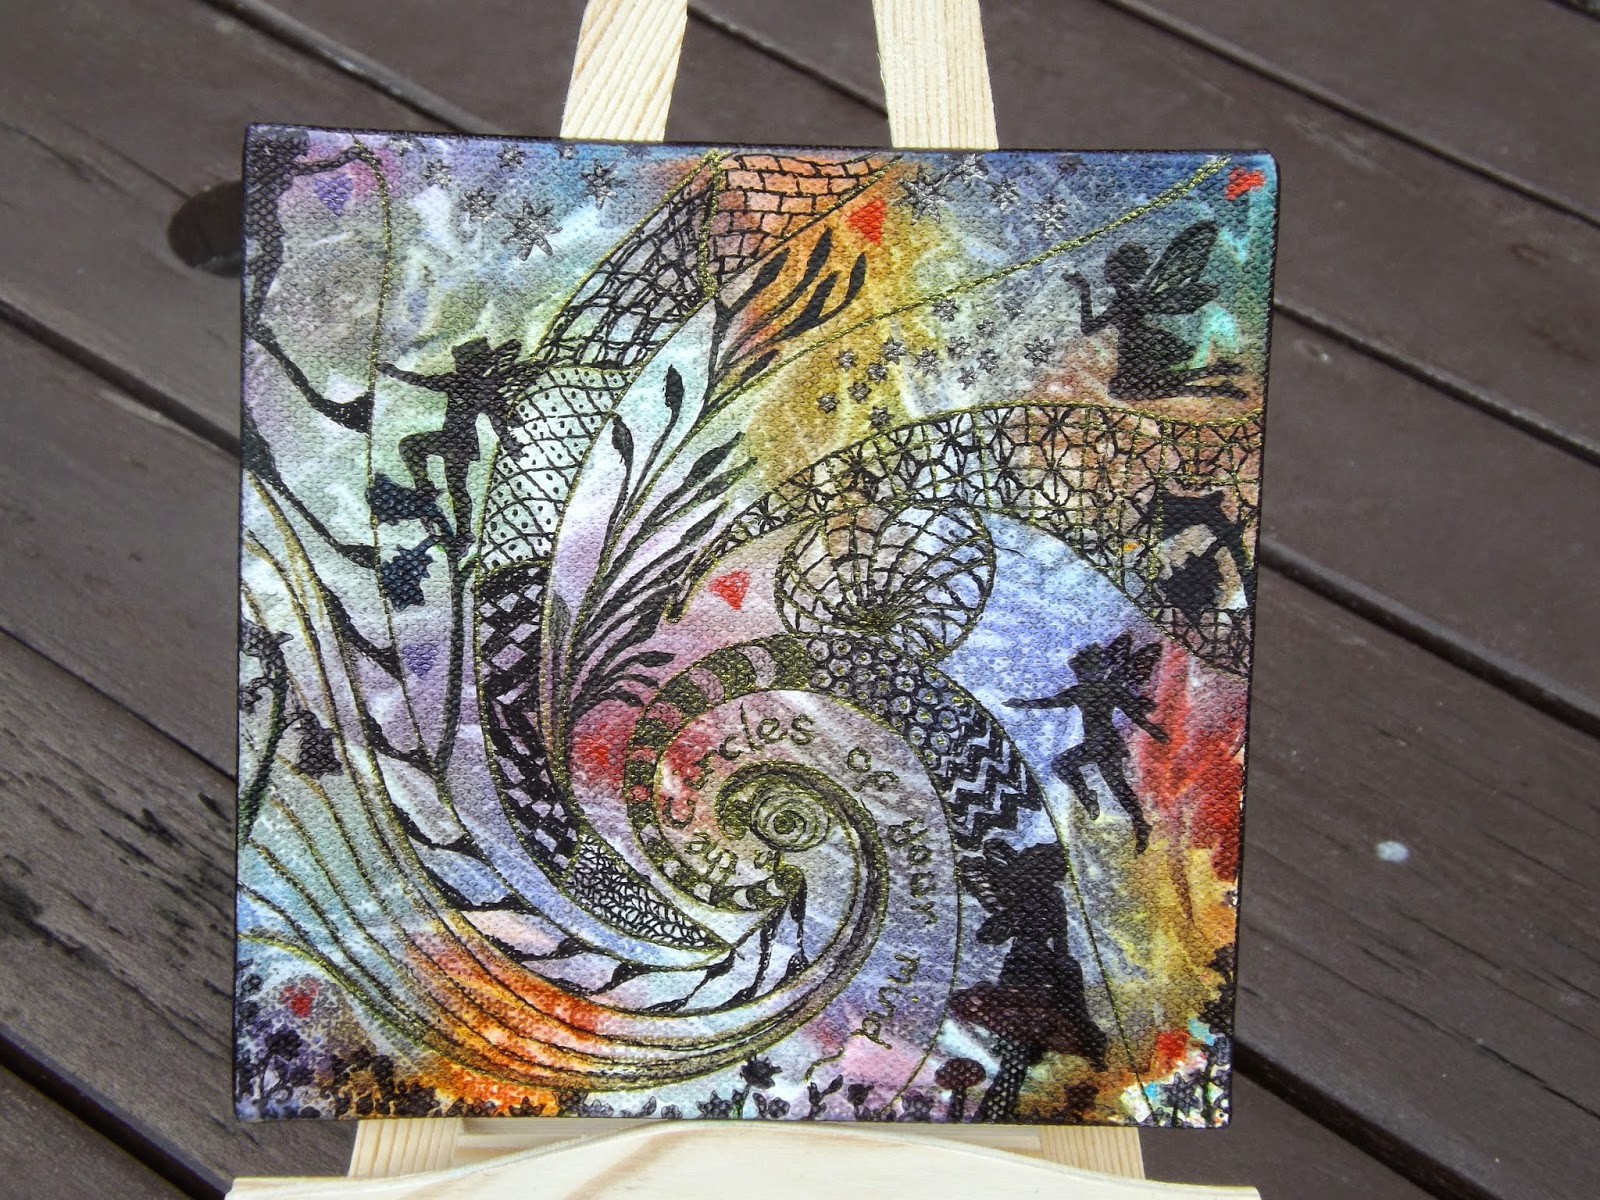
Anything but a Card ....


Products used in the making of this Canvas include :

Clarity stamps :
Wee folk sets 3 and 4
Clarity stencil from the stencil design club 
Brushos
Spray Starch
Cling Film
Micron Pen 
Jet Black Archival Inkpad
6 x 6  Primed Canvas Board
Gold Sparkling Signo Pen

Take the canvas board,brushos,spray starch and cut a piece of cling film large enough to cover the board.

Take the canvas board and sprinkle brushos of various colours onto the board.
Then spray with the spray starch, do not overdo this step as otherwise it will just all end up a runny mess .... to coin Barbara Grays phrase ... how does she know this ?? lol   Then cover with the cling film and manipulate with your fingers, put to one side and leave to dry.

When dry take the stencil and micron pen, position this however you choose and tape in place. Draw the lines onto the canvas. Remove stencil.

Stamp the elves, fairies, stars and flowers from the Wee Folk sets randomly onto canvas. I chose to do some Zentangle into some of the spaces but this is completely optional.

I then used the gold pen to enhance some areas.

Thanks for looking 

Love Doreen


Sunday, 8 March 2015

Hobby Art Challenge
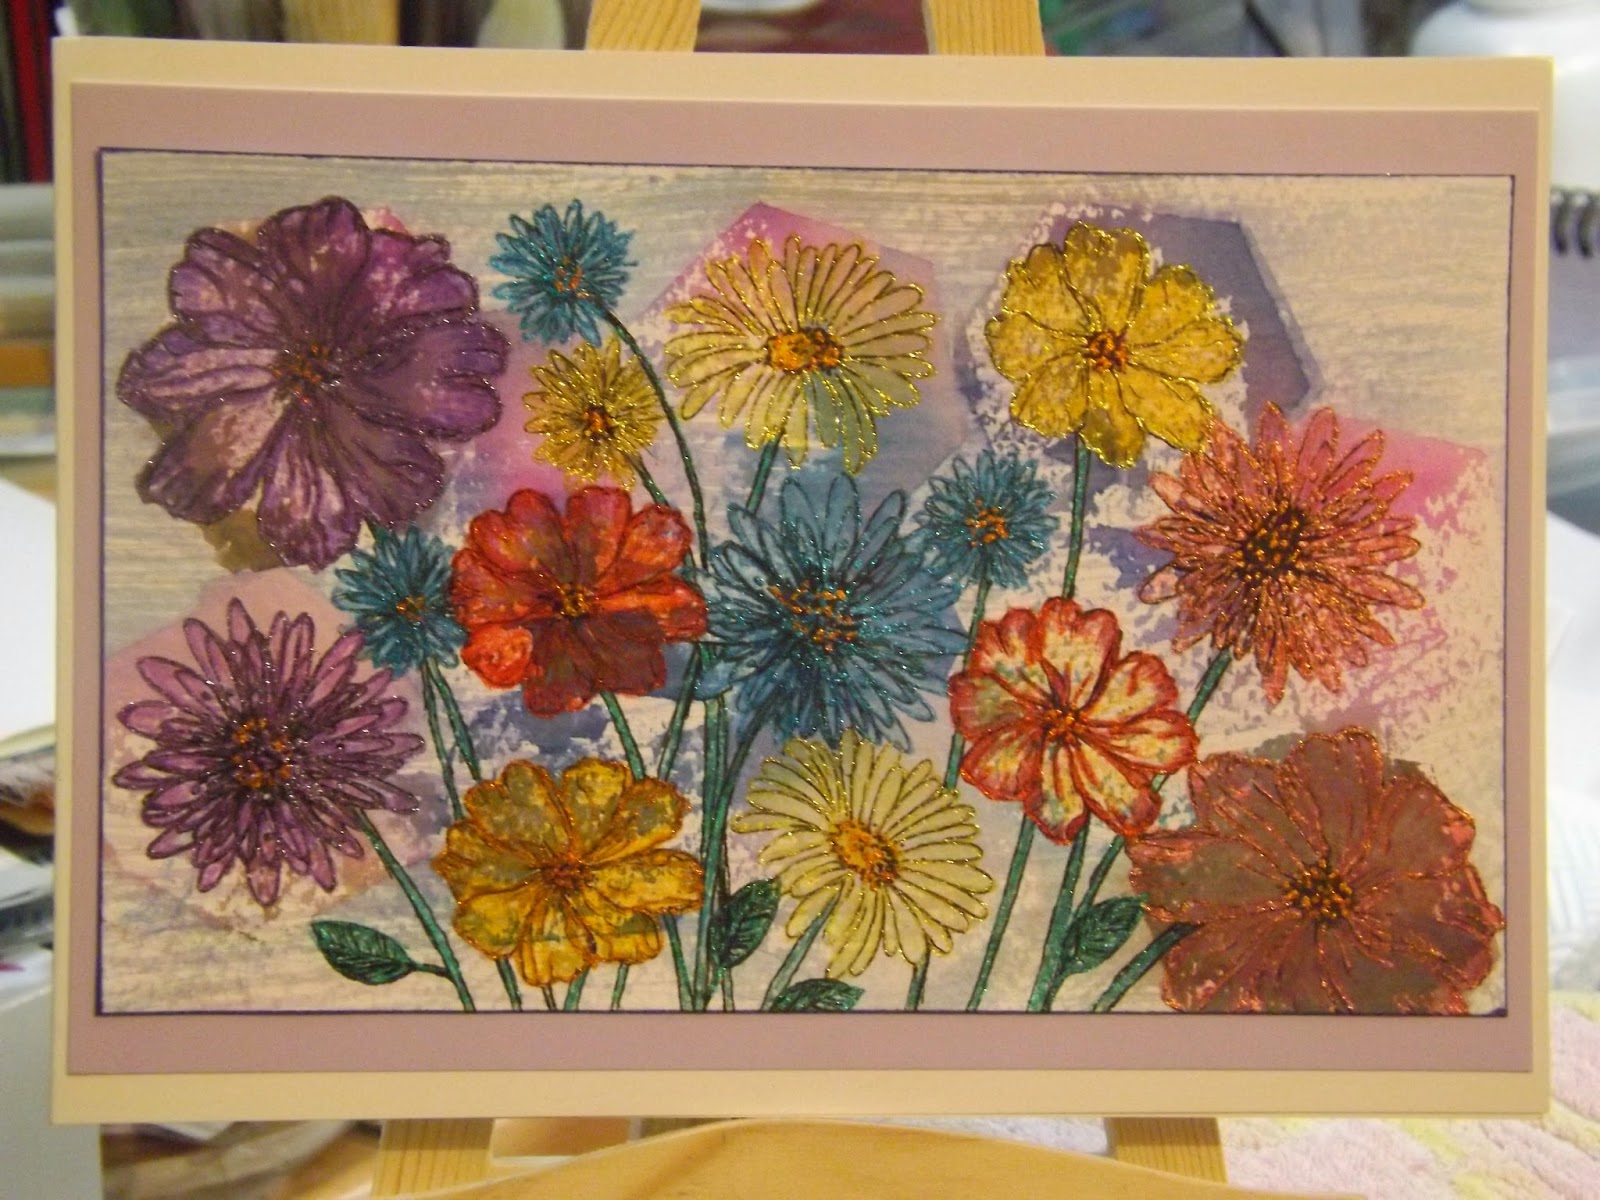
Flowers for Friends


Products used

Bleeding Art Tissue
CS017D Floral Sketches (Hobby Art Stamps)
CS013D Floral Greeting (Hobby Art Stamps)
Primary selection of Spectrum Noir Pencils
Metallic Gel Pens 
Black Micron Pen 
Versafine Black Ink Pad
Watercolour Card 
Complimentary coloured card


I used a compass and ruler to make a template to cut some hexagon shapes in the tissue, wet the card and applied the tissue and then misted again with water. Leave to dry.

When dry, lift the tissue, and I found I had a puddle of coloured water under the card so using a fan shaped brush mopped it up and dragged the colour across the white areas left on the card.

I then stamped using a variety of the flower heads and then took the micron pen to draw in the stems of the flowers as if they were in a wide necked vase.

I then coloured the flower heads and stems using the pencils. Then to lift the flowers used gel pens to enhance them using the stamped lines as a guide. 

Lastly cut the card to the size you require and mat and layer using the piece of corresponding coloured card. 

Thank you for looking 

love Doreen


Monday, 9 February 2015


Lavinia Stamps Challenge #2


This is the first time I have entered the Lavinia Stamps Challenge so here goes...

Wednesday, 21 January 2015

Anything Goes Lavinia Stamp Challenge


Relaxing with Lavinia Stamps 


Products used in the making of this card were : 

Gesso
Cosmic Shimmer Vintage ink spray
H20's
White paint fine line marker
Archival Black ink pad for stamping
8 x 8 white card
Black Mirri Board


Thanks for looking 

Love Doreen 


Tuesday, 30 December 2014

Clarity Challenge #22 Trees

Clarity Challenge #22 

Trees


This card was made with the use of Clarity Stamp ATC stamps.stencil and stencil brushes.
Additional products include Distress inks and a Sakura micron pen 005.

Thanks for looking 

love 
Doreen 

Saturday, 22 November 2014

How 3 months fly by when you're having fun ....


3 Months on the Oak House Studio Design Team ....


And so my term ends .... I am and always will be grateful for the opportunity Lynnda gave to me for my very first time on a Design Team but I will not be a stranger to the inkspired site and will continue to blog on my own Blog page.

Oak House Studio products are a definite favourite of mine and I will also continue use them and spread the word of how good they are actually are, so many out there haven't heard of Oak House Studio or if they have they don't have the products so let's all take the time to spread the word .....

Thank you for Looking 

Love Doreen x

Friday, 21 November 2014

Thank You .....


A Thank You Gift ....

Take a box

  
Using gesso completely paint the box inside and out and leave to dry.


I used a leaf shaped perforated piece of wrapping to make a stencil and using Oak House Studio Ink Pads in Green as Grass and Valentine
I firstly inked through the holes which I had taped into place using the green ink pad and a blender, take off the paper but just put it to one side whilst you wait for the ink to dry. No replace the stencil obviously not lining up with the previous inking but don't worry if you do get an overlap now using the red ink repeat the process. When Dry I used a spray glitter to add a bit of bling.


On the inside of the box repeat the colour scheme but just randomly ink with bubble wrap to add colour to the inside of the box. 


Line with tissue paper of choice, I like to scrunch mine up but you may choose to fold yours or to shred it. 


Finally fill with your gift and either add a tag or wrap and make a card to go to the recipient. 

This was made for the Lovely Lynnda Worsnop who gave me my first time experience of working on a Design Team. I have to say I have found it not only a very enjoyable time but I have learned lots and have come to love all the products in the Oak House Studio range. 

Thank you Lynnda xx


Thank you for looking 
love Doreen

Monday, 17 November 2014

Winter Challenge .... O' Christmas Tree


O' Christmas Tree


Products used in the making of this card include 

Forest Green Colour Chemistry  Pigment Ink Pad
And a selection of Glitter Glue for baubles and swags.

Stamp the Tree using the Forest Green ink pad, and in Lemon Yellow for the star. Paint the star using the gold Acrylic Ink, then using the Malachite Acrylic Ink paint the tree using small strokes of a fine paint brush. For the trunk of the tree blend acrylic inks to make brown.

Spray the background of the tree using a choice of the bottled ink colours that you like, you can either mask the tree or use a piece of kitchen roll to take the colour off the tree before it dries. I finally allowed the gold to almost dry and then using downward strokes of the kitchen roll take off the excess ink to leave a sparkly finish in places to the tree.

Finally stamp the sentiment I used a Fired Brick ink pad for this. Then mount onto a piece of card of your choice. When this is done take the glitter glue to decorate your tree.

Thank you for looking

Love Doreen


Sunday, 16 November 2014

Winter / Christmas Photo Frame


Christmas Card with internal Photo Frame

Product used in the making of this card were ;
Colour Chemistry Bottled Inks Regal Claret,Citrus Lime and Glorious Gold
Colour Chemistry Ink Pads Spring Green, Forest Green, Green as Grass, Valentine, Fired Brick, Slate Grey and Powder Blue.
A Piece of Acetate cut to fit inside frame
1mm thick double sided foam pads or tape 
Pale Blue Vellum
Fluffy Stuff 
A blank Scallop edge 8 x 8 card
and Stickles or glitter.

  
Firstly I cut a blank piece of card and rounded of the 2 corners to fit inside a blank 8 x 8 scallop edged card. Tear the vellum to make hills, stick onto card. Use a wet wipe dipped into the powder blue and slate grey ink pads then randomly dab onto card turning in the fingers to fill the sky area. Then take the Beech tree and stamp onto card, then I used the Oak to stamp the other trees. Add the fluffy stuff and heat to make snow, then apply the stickles to the fluffy stuff but do not cover completely. Leave to one side to dry.


Take a piece of stamping card and cut to fit inside the card comfortably leaving room on the left hand side to allow for access to put photographs in. 
Leave a half inch border all round and cut out the centres using a craft knife or die cutting machine if you have one. Do not glue the acetate in place until you have decorated the frame using inks in spray bottles and then stamp on top once dry,

Take the acetate and using a double sided tape apply to frame. Using the foam tape apply it to the top, middle and bottom borders of frame and to the right hand vertical side of frame do not put any down the left hand or middle vertical borders. Line up carefully and stick to the inside of the card. Then put the stamped front onto the card using glue.


I checked the aperture was ok and stamped onto a scrap of card to check the fit for the photographs that this card was requested for.

This card was a bit of a challenge for me as I had never made anything like it before but I think it has worked quite well all things considered.

The Big Christmas Collection of stamps is on special offer this week at Oak House Studio and a very useful set of stamps it is too !

Thank You for Looking

Love Doreen 

Sunday, 2 November 2014

November Challenge at Oak House Studio - " Winter "


Winter Scene


To make this card the list of ' ingredients ' is a short one they include ;

Archival Colbalt Blue ink pad
White fluffy stuff or a white fine line paint pen.
and 
1 each of the Colour Chemistry ink pads in Powder Blue and Slate
other items include a piece of contrast card, copy paper, a make up sponge and a wet wipe.


Take the White card, tree stamp and Colbalt blue ink pad, stamp first tree straight from the ink pad, ink up the stamp again stamp onto a piece of scrap paper then place the stamp slightly back and up and to the right of the first tree using the second generation of ink. Repeat this again in the centre and then to the forefront of the card taking the second generation off the page for the last image.

Tear your copy paper to make hills and then using the make up sponge or if you don't have a make up sponge use something similar to make a rounded shape in between your fingers and thumb. Place your torn paper with just the base of the tree showing and using your powder blue dab ink along the edge and pulling the ink toward the base of the card to give a grounding for the tree and a hilly terrain. repeat in the same way for all the trees, then add some hills to the back of the trees and some little hillocks to the fore just for good effect. 

Next step is the sky, take your wet wipe and scrunch it up to make a pad between your thumb and 2 fore fingers then dab onto your powder blue and loose some of the ink on your piece of scrap paper you don't want to much colour. Dab this lightly and randomly in the sky area down to the horizon twisting and turning your hand whilst doing so, when you feel it is enough use the same piece of wipe and go straight into the slate ink pad again loosing some of the colour on the piece of scrap, go over the blue to give a really moody feel to the sky. ( Try not to press to hard as this will make your card ripple with the moisture from the wipe.) 

The next step is to add the fluffy stuff randomly into the sky to give the snowy effect and to also give the illusion of snow on the ground you will just need to follow the terrain here and there too but don't squeeze the bottle to hard as this expands when it is heated, to get an idea of how much try a little on your piece of scrap first. Heat until it fluffs up nicely and then put to one side. If you don't want such an obvious display of snow and prefer a more subtle approach then use a white fine line paint pen.

 I used an A5 card for mine and trimmed a contrast colour or a piece of black card to make a matt then trimmed the artwork down to fit with a border showing. 

I used this technique at my first workshop and the results speak for themselves:


By Elizabeth


By Ron


By Christine


By Denise


By Johanna

Not at all different from the original really are they ? Considering 3 of them had never stamped before this workshop I think they did very well. 

 Someone did ask if it was ok to use glitter on the card ? Of course it is just spray the artwork before mounting onto your card .....


Thank you for looking and if you leave a comment I will definitely pass it on to all concerned xx