Friday, 29 October 2021

Alliums in Blueprint

  Alliums in Blueprint

Hello to you all, here we are and October is almost over, how scary is that ?

Today is my last post of the month and although this first sample may look tricky it's not as bad as it seems at first.

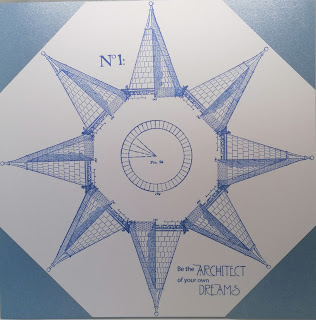
Using the Allium Blueprint and a Blue Inkpad of choice, Stazon may be a good choice as it dries very quickly and is unlikely to smudge.

Firstly I cut a square piece of white card 8"x 8" and marked the centre point on the north, south, east and west of the card, align the stamp with the points and stamp the four points and then fill in the gaps, the base of the stamps will overlap slightly but I didn't mind this although I did take the little pieces on either side off the stamp but if you prefer not to just remove the ink carefully with a damp cloth. I have used another blueprint stamp in the centre or you could just as easily replace it with a sentiment.

I mounted the topper onto a square piece of pearlescent card from my stash the same size as my base card. Trim the topper before adding to the base card, I always find this easier if I turn the topper away from me and cut along the matt card.

Simple but perfect card for men who will appreciate the Blueprint detail and it will look good in whatever colour you choose to use. 


A few more samples from this stamp set which no matter how you choose to use it will look good. 


It has been good to re-visit the Blueprint stamps this month, I hope you have enjoyed seeing them all.
Thank you for looking in 
Love Doreen

Monday, 18 October 2021

Enchanting Echinacea

Enchanting Echinacea 

Hello all, today I will be sharing samples of the Echinacea Blueprint stamp set. The Echinacea has to be one of my favourite plants so pretty and they do last a lot longer than you would think if you deadhead them regularly.

For this first sample I made a mask of the heart and cut the Masking Tissue the same size as the topper which really helped when making both the heart itself and for masking the outside when using the stencil to make 'sunrays' inside of the heart, these masks can be kept for future use and will be used many times more yet.

I used Distress Inkpads to colour and Promarkers to add extra detail.


Here are a few more samples for you the Echinacea is a very easy flower to cut out so although you may not like fussy cutting this is not too fussy.


Thank you for looking in today, take care

Love Doreen


Friday, 8 October 2021

Rainbow Chrysathemums

 Rainbow Chrysanthemums 

Hello everyone and welcome to October .... a way in now I know but where the months are going since July I really don't know. 

Today I would like to share some of my makes from the September shows, firstly the Chrysanthemum Blueprint. Using a tag from my stash I painted the tag with White Gesso and then once dry colour randomly with Distress Inkpads of choice using either blending sponges or brushes. Stamp using VersaMark and Black Embossing Powder.

Use a black marker around the edges of the tag and Clear Gems to decorate and finish with a piece of ribbon.


Here are a few more of my September samples using the same stamp set.


Thank you for looking in today 

Love Doreen

Tuesday, 28 September 2021

Poinsettias - Christmas is coming ...

Poinsettias - Christmas is coming ...


 Today I am using a set  of DL Rubber Stamps the Poinsettia Script is a beautifully designed set and can easily be made into a 3d image should the mood take you. I have shown the front and the reverse of this heart which could be used on a gift or as a gift to someone special. Or maybe even a Christmas Decoration.
I used a blank Rice Paper to stamp onto and then coloured using Distress Inkpads a little water and paint brush, then once dry stamped the image using  A Versafine Clair Nocturne Inkpad. To add extra colour to the image I have used some watercolour brush pens. To seal the image onto the heart I have used Deco Art Decoupage. On the reverse I have used a pre-printed piece of Rice Paper, sealing once again and then after completing both sides of this heart I used a permanent black chisel tipped marker to go around the edge. Finally I used a suitable piece of organza ribbon making a loop and bow to hang the heart from.


Thank you for looking in today 

Love Doreen


Saturday, 18 September 2021

Heaven and Earth

Heaven and Earth 


Today I will be sharing some of my samples from last months newly launched designs by the talented Fiona Randall there are two A4 sets and to choose a favourite is nigh on impossible,


The first of my samples is using the Celestial Set, using Alcohol Inks and a Lift Out Inkpad which quite literally does as the name suggests.
Using Yupo and a selection of Alcohol Inks I used 3 different shades of blue. 
Ink up the stamp of choice with the Lift Out Inkpad as you would with any other Inkpad and stamp onto the prepared and dry Alcohol Ink background. Lift off after a few seconds which will have allowed the Inkpad to do its work. Do not waste what you have lifted from the background stamp it onto a spare piece of card or into a journal. Two for the price of one, that can't be bad can it ?? 


The next photo is from the Sacred Set using the same technique but a different colourway.


For another look you can also use Versamark and White Embossing Powder on the Heavyweight Yupo but add the heat in short bursts as because the Yupo is basically a plastic paper it tends to buckle if too much heat is applied to it.


These are fairly quick and addictive techniques but very effective, I hope you have enjoyed looking today.

Love Doreen


Wednesday, 8 September 2021

Beautifully Evergreen

 Welcome to Christmas inspiration in September. Today I have four samples to show you but will not bore you with ins and outs of how each of them were made. They are all fairly easy to achieve. They are all made using the fabulous Holly Script Rubber Stamp Sheet - DL.


This first sample was made using the trusty A4 Drawing Cartridgecut the card slightly larger than you want your finished topper to be. Using a Green Distress Inkpad blend the colour into your card leaving an area in the centre free of ink. Spritz with water and lift excess water off with kitchen roll. Taking a Black inkpad of choice once background is dry, stamp image onto the card. Heat set with a heat gun. then colour the Holly leaves with either paint or using a darker green inkpad to paint with, working fairly quickly add either embossing powder or glaze if you have it to the leaves and emboss with your heat gun. Next, using stickles or glitter glue of choice enhance the veins of the holly and add some lighter stickles to the stem to give the impression of light. Then add the red to the berries leave to one side to dry. Put well away from your work area as it does take a while to dry and I have many a mishap with not doing so. I used a piece of white card to matt the topper onto and a piece of red card to folded for the base. 


For this sample I chose a rustic feel using sepia tones and a piece of corrugated card for the base.


This next sample uses some odds and ends from my stash including a bauble shaped piece of mount board. Ribbon and bakers twine add a little decoration. Coloured using Distress Inkpads to paint with, also a little ink on a soft brush to add some colour to the outside edge of the bauble.


Another sample using a backing made some time ago to make a small card that uses the delightful verse that is included in this beautiful set of stamps.


Thank you for looking in today

Love Doreen


Sunday, 29 August 2021

Perfectly Perched

 Perfectly Perched


The stamp used in the making of these cards is called
It is a very detailed stamp and full of potential. The first one is quite easy to make as is the second of the cards although it is a bit more fiddly if you choose to cut it out as I have.


The Bauble is made using a stencil, but if you don't have one fold a piece of paper in half and cut the shape you would like. Using a low tack tape position your bauble in place, stamp your image through the stencil, using the Distress Inkpad and a soft blending brush define the shape of your bauble. Spritz your paints with water and colour your image.
Then finally using the twig from the Owl Edges stamp sheet and the Versafine Clair Green Oasis stamp randomly around the image. 


This second card was stamped using a White Inkpad and White Embossing Powder onto Black Card. I used Iridescent Watercolour Paints to colour this piece and mounted the image after fussy cutting it onto a gold satin card with some green sheer ribbon on two of the corners. The image is mounted onto the card using a silicone glue gel. 


Thank you for looking in today

Love Doreen xx 

Wednesday, 18 August 2021

Floral Delights

 Floral Delights


Today I have two samples from the last months shows, both are from the beautiful
The first of the images used is the stunning Morning Glory, such a beautiful yet delicate flower. This set has so many fabulous images (16 in total) six of the images are large and make a real statement, but the others on this stamp sheet are equally as beautiful and detailed in their own right and very useful too.
The second is an easily recognisable Cala Lily and although I would love some in the garden my hubby dislikes them with a passion, so I content myself looking at the wonderful display in my neighbours garden.


The Morning Glory was made first by using a Gelli Plate with dye inkpads and a sheet of kitchen roll applied whilst the ink was still wet, taken off fairly quickly and then using a sheet of card larger than the size needed for the finished card and take a print then set to one side to dry.
Stamp the main image onto another piece of card, then using your dye inkpads as paints colour your image.
I then tore the edges of the card and with a soft brush applied ink to the edges of the torn piece to add definition.


With the Cala Lily I stamped the image then coloured it using Inktense Pencils and a Clear Sparkle Brush Pen to blend. I stamped and coloured the dragonflies in the same way. The clear gems were added once the image was dry,


Thank you for looking in today

Love Doreen xx

Saturday, 7 August 2021

Summers Day

 Summers Day


Hi everyone, here are my picks for today. Can't you just imagine looking a view just like this out of a window ? 
This was a fairly quick make to be fair. I used a cloud mask and some of my Distress Inkpads applying them with soft brushes onto some glossy card.
Next with some Versafine Clair Green inkpads and the 
 For the grasses in the foreground I just used the tops of the stamps, applying them randomly. When completely dry buff with a soft cloth to give a sheen to your finished card and although I chose not to you can easily add a sentiment of your own choice to the card.


Here is another card which uses the grasses from the Walk Tall Rubber Stamp sheet - DL
in the background to compliment the beautiful Majestic Crane Rubber Stamp sheet - DL 
Again this is a simple card to make using the Majestic Crane stamped directly onto a Pixie Powder background which work exactly the same as brushes but with added mica powder.
The card used for this make is the trusty  A4 Drawing Cartridge 220gsm - pk 10 Which is definitely my go to card in the majority of my makes. 


Well that is all from me today, I will be back again later in the month but there is a daily blogpost from the Design Team where you can see some fantastic makes from the rest of the team to inspire you.

Thank You for looking in 

Love Doreen xx

Wednesday, 28 July 2021

Sitting Pretty

Sitting Pretty


Today I would like to share this make with you, it uses a stamp set called
I also used a Grey Inkpad, Watercolour Brush Pens, a Clear Glitter Gel Brush Pen and one of my Make Art inkpads Garden Patina which I used to colour the background and the mermaids spotlight bubble.

Another card made using the Mermaid Queen set and the very versatile and much loved
I used the worker stamps in the Mermaid Queen stamp set, a mop up background on glossy card, the stamped images were embossed using a clear embossing powder.
The bubbles from the Make Your Mark set I feel set the scene on the backing card for the finished topper.


Thank you for looking in today

Love Doreen 

Monday, 19 July 2021

Punky Posy

 Punky Posy

Hello all Chocolate Baroquers, I'm back for my second visit this month. I would like to share this Steampunk floral tag with you today.


Using a sparkle paint to cover the MDF Tag used in one coat, leave to dry and stamp the Roses onto Drawing Cartridge, I coloured the roses using Inktense Pencils and after shaping slightly I used a crackle glaze to add a sheen to the roses.
Returning to the tag I stamped and heat embossed the cogs randomly directly onto the tag using a black inkpad and clear embossing powder.

Apply the roses to the tag using a gel of to aid the depth required, I also added a metal cog from my embellishment stash. To finish I used a little glitter and some variegated coloured organza ribbon for a bow and to hang the tag from.


I also used the Steampunk Butterfly stamps to create this card, which actually contains the beautiful Steampunk Butterfly.


Thank you so much for looking in today 

Love Doreen


Wednesday, 7 July 2021

Memories Of The Beach

 Memories Of The Beach


Hello everyone, I hope you are all well and looking forward to the weekend, here are two of my projects from last months shows.

The tag in the first photo and the canvas both use the Seashell Collage

The tag is a bit of a long make but only because I used 3 different colour Crackle Enamels, which I spread in a random way mixing them without worrying about the mix. Set aside to dry. Then stamp the images in a permanent ink and fussy cut the images. Once the crackle has dried using a 3d gel to mount the images and then using a sealant of choice to seal the crackle and images.

The Canvas Board is very straight forward to make but do keep a spare piece of smooth paper to hand. I stamped using the Archival Colbalt Blue inkpad, the images need to be stamped with a firm pressure then using the paper you have to hand stamp the image this will leave a textured print for you to use either to decoupage or to use on another project.

Thank you for looking in today 

Love Doreen