Thursday 30 December 2021

Floral Fun

Floral Fun

Hello all, I hope you have now recovered from your Christmas meals and are all suitably satisfied having had a very enjoyable time.

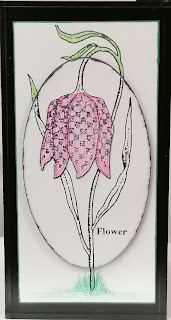
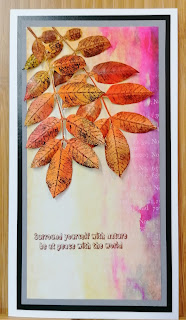
Today I would like to share some of my floral makes from the November Shows. The first shows a simple card using The Snakes Head Fritilary taken from the Happy Flowers Day stamp set. I find it amazing how such a delicate flower can have such beautiful detailed markings, isn't nature just wonderful ?

I stamped this image twice firstly onto a piece of white card and then onto an oval piece of mountboard which I found in my stash.

I coloured just the leaves and some of the stem on the card and just the head of the fritilary on the Mountboard, with a few strokes of the pencil at the bottom of the stem to ground it with some blades of grass. Very easily lined up to mount with double sided foam tape to make a quick, simple but effective card. 


One of my favourite florals so beautiful and needing so little time to make for an effective and easily made card suitable for any number of occasions depending on how you decide to colour it.


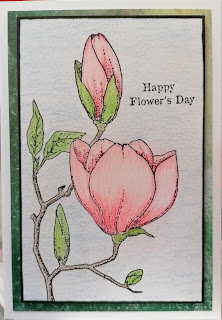
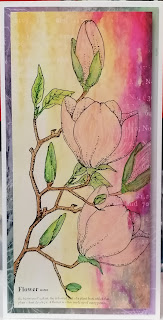
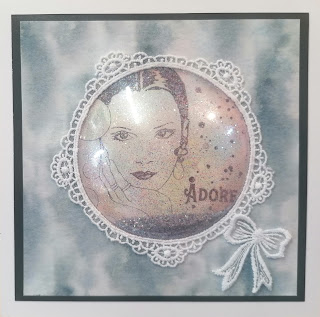
Another of the Magnolias how could I resist this is quite simply stamped onto Chocolate Baroque designed card and coloured using Koh-I-Noor Brilliant Water Colour Palette these paints are such a delight to use and the card accepts the watercolour without a problem.


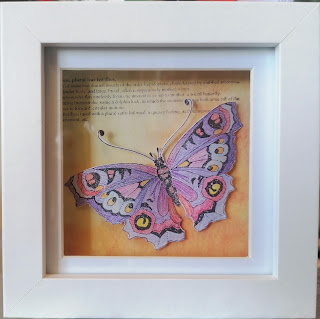
Finally for something a little different from the set, this beautiful Butterfly deserved to be showcased by itself, don't Chocolate Baroque do beautiful butterflies ? 
This is mounted in a small shadow box I have had hanging around for a while now but this stamp was the perfect size to fit it so I stamped, coloured and fussy cut the image and then mounted it into the box having stamped the dictionary explanation of the Butterfly onto a complimentary coloured piece of card. 


Many thanks for popping in today, may I also take this opportunity to wish you all a Very Happy New Year.

Love Doreen 

Monday 20 December 2021

Have A Heart

 Have a Heart

Hello everyone, I hope today finds you all fit and well. Today I would like to share with you all some of the samples I made for the November shows using A Heart Full Of Love stamp set.

This first card is simply stamped and framed with the broken heart which is in the set which really gives a random look to the frame. For the stamen I have used a black fine liner pen. I chose not to colour the flowers as I didn't want to spoil the classic feel that I felt the frame had given to the card.  


All the cards I have made using this set are easily achievable and would look lovely in a variety of colour ways.  This card simply uses embossing powders to achieve a simple but attractive card. Both have been stamped using a Versamark inkpad plus gold and white embossing powders. 


This next card is more about the sentiment of the verse than anything else, gentle blending with inks and using a white gel pen, a red marker and some floral embellishments to finish the look.


Thank you for popping in today many good wishes for a Very Happy Christmas,

Love Doreen


Thursday 9 December 2021

For The Love Of Trees

                                                             For The Love Of Trees

Hello everyone well December already and the days to Christmas are flying by. I am nowhere near ready and not quite sure I will be, but I dare say by hook or by crook I will get there somehow.

Today I would like to share some of my samples using the fabulous variety of Tree stamps featured in the November shows. I have to admit tree stamps are a huge weakness of mine, so versatile and useful in all sorts of different ways.

The first card shown below uses 

Frosty Trees

Versafine Clair Acorn and Pine Cone.

 A White Gel pen.

Masking Tissue.

Country Views

After stamping the Cottage and the Trees using Masking Tissue to give added depth the colour added was applies using soft brushes. The White Gel Pen was used to give the illusion of snow on the roof and in the air. The sentiment was stamped and applied to the card using double sided tape.

This is so simple, it uses stamps from the 

                                    Trees a Crowd Rubber Stamp sheet

MDF plaque and stand, Masking Tissue, White Gesso, Grey Inkpad, apart from the stamping all inks were applied with a soft brush gradually building up the colour.


This sample is rescued from the bin, simply stamped using Versafine Inkpads and a gold gel pen to add a little sparkle and mounted onto Kraft Card.


The next sample is fairly easy to achieve it just takes a little thought before stamping. I have used just an Archival Colbalt Blue plus a Promarker and Ruler.


This next sample uses a Plywood Postcard Stamped and enhanced with Pyrography and inks to colour.


This sample is not difficult and again uses the stamps from the Trees a Crowd stamps. I used a light pencil to help with the designing of this. Two different shades of green to stamp and a fine liner to draw the circles around the images. A green pencil has been used to ground the image in the centre of the card.


Thanks for looking in today 

Love Doreen 

Monday 22 November 2021

Beautiful

  Beautiful

Beauty is in the Eyes  I absolutely fell in love with this stamp the moment I saw it, so very versatile and lends itself to no end of ideas. The first of mine today is a fan which I bought a month or so ago.

I used acrylic paints and stamped on them using Versafine and Versamark and White Embossing Powder. The Red and White Dots are also Acrylic Paint using a flat ended cocktail stick, the lipstick was applied with a very fine paintbrush.


This card incorporates the use of a circle dome and some lacy odds and ends from my stash. Although I did use an antistatic bag to help the glitter not to coat the dome it didn't really work out that way but now I quite like the affect it gives, lets just call that a happy accident. I stamped the image using a Stazon Gothic Purple Inkpad.


This card uses a really old stencil from my stash for the background and inkpads, plus some watercolour pencils to colour the image which I activated using a shimmer spray instead of water.


A very simple envelope, made using the  Tagtastic stamp and a section of the the Beauty is in the eyes leaving a section of the tag to allow the name and address to be written in, be sure to use an inkpad that will withstand a rainfall as poor postie can't be held responsible for the weather. I would love a stamped envelope to drop onto my doormat I would open it carefully and keep it and perhaps make a bookmark with it.


Thank you for looking in today 

Love Doreen xx 

Wednesday 10 November 2021

Autumn Leaves

 Autumn Leaves

Hello once again everyone, well I can hardly believe we are already into the second week of November, did someone fast forward the clocks since the end of August because it certainly feels that way to me !! 

Today I would like to share my four samples using the From Nature 1.Such a beautiful set of stamps.The first is such a simple card simply made using a multicoloured inkpad, masking tape, fineliner pen and a gold gel pen.

Mask off the area you want using the tape making sure that there is enough tape either side of the area for stamping, if the there isn't simply use another strip of tape. Stamp using a multicoloured ink pad or if you haven't got one use a few autumnal coloured pads to get the effect desired.

Remove the tape carefully once the ink is completely dry, using a ruler outline the stamped area with a fineliner pen, I added a second line a few millimetres away from the first one as I felt it added more dimension. The word Nature was stamped on an offcut of card and the lines added to tie in with the faux panel. I used the Gold gel pen to highlight the veins on the leaves and to outline the word Autumn.

This card uses a selection of inkpads and gilding flakes plus Versamark and White Embossing powder, to apply the gilding flakes you will need a glue suitable to apply the gilding flakes to. Apply the inks using either a make up sponge to achieve the Bokeh technique. A dark ink used around the outside of the card helps to frame the design.


This card uses some printed card as a background and then the leaves were stamped and coloured using ink sprays, left to dry naturally and then cut out. Shape the leaves and apply to the card using glue gel.


This card also is stamped on to a printed card stock. I used a mask that I had stamped onto 

Masking Tissue fussy cut the image out, stamping the centre image first and then applying the mask before stamping the other images.


Thank you for looking in today

Love Doreen xx


Friday 29 October 2021

Alliums in Blueprint

  Alliums in Blueprint

Hello to you all, here we are and October is almost over, how scary is that ?

Today is my last post of the month and although this first sample may look tricky it's not as bad as it seems at first.

Using the Allium Blueprint and a Blue Inkpad of choice, Stazon may be a good choice as it dries very quickly and is unlikely to smudge.

Firstly I cut a square piece of white card 8"x 8" and marked the centre point on the north, south, east and west of the card, align the stamp with the points and stamp the four points and then fill in the gaps, the base of the stamps will overlap slightly but I didn't mind this although I did take the little pieces on either side off the stamp but if you prefer not to just remove the ink carefully with a damp cloth. I have used another blueprint stamp in the centre or you could just as easily replace it with a sentiment.

I mounted the topper onto a square piece of pearlescent card from my stash the same size as my base card. Trim the topper before adding to the base card, I always find this easier if I turn the topper away from me and cut along the matt card.

Simple but perfect card for men who will appreciate the Blueprint detail and it will look good in whatever colour you choose to use. 


A few more samples from this stamp set which no matter how you choose to use it will look good. 


It has been good to re-visit the Blueprint stamps this month, I hope you have enjoyed seeing them all.
Thank you for looking in 
Love Doreen

Monday 18 October 2021

Enchanting Echinacea

Enchanting Echinacea 

Hello all, today I will be sharing samples of the Echinacea Blueprint stamp set. The Echinacea has to be one of my favourite plants so pretty and they do last a lot longer than you would think if you deadhead them regularly.

For this first sample I made a mask of the heart and cut the Masking Tissue the same size as the topper which really helped when making both the heart itself and for masking the outside when using the stencil to make 'sunrays' inside of the heart, these masks can be kept for future use and will be used many times more yet.

I used Distress Inkpads to colour and Promarkers to add extra detail.


Here are a few more samples for you the Echinacea is a very easy flower to cut out so although you may not like fussy cutting this is not too fussy.


Thank you for looking in today, take care

Love Doreen


Friday 8 October 2021

Rainbow Chrysathemums

 Rainbow Chrysanthemums 

Hello everyone and welcome to October .... a way in now I know but where the months are going since July I really don't know. 

Today I would like to share some of my makes from the September shows, firstly the Chrysanthemum Blueprint. Using a tag from my stash I painted the tag with White Gesso and then once dry colour randomly with Distress Inkpads of choice using either blending sponges or brushes. Stamp using VersaMark and Black Embossing Powder.

Use a black marker around the edges of the tag and Clear Gems to decorate and finish with a piece of ribbon.


Here are a few more of my September samples using the same stamp set.


Thank you for looking in today 

Love Doreen

Tuesday 28 September 2021

Poinsettias - Christmas is coming ...

Poinsettias - Christmas is coming ...


 Today I am using a set  of DL Rubber Stamps the Poinsettia Script is a beautifully designed set and can easily be made into a 3d image should the mood take you. I have shown the front and the reverse of this heart which could be used on a gift or as a gift to someone special. Or maybe even a Christmas Decoration.
I used a blank Rice Paper to stamp onto and then coloured using Distress Inkpads a little water and paint brush, then once dry stamped the image using  A Versafine Clair Nocturne Inkpad. To add extra colour to the image I have used some watercolour brush pens. To seal the image onto the heart I have used Deco Art Decoupage. On the reverse I have used a pre-printed piece of Rice Paper, sealing once again and then after completing both sides of this heart I used a permanent black chisel tipped marker to go around the edge. Finally I used a suitable piece of organza ribbon making a loop and bow to hang the heart from.


Thank you for looking in today 

Love Doreen


Saturday 18 September 2021

Heaven and Earth

Heaven and Earth 


Today I will be sharing some of my samples from last months newly launched designs by the talented Fiona Randall there are two A4 sets and to choose a favourite is nigh on impossible,


The first of my samples is using the Celestial Set, using Alcohol Inks and a Lift Out Inkpad which quite literally does as the name suggests.
Using Yupo and a selection of Alcohol Inks I used 3 different shades of blue. 
Ink up the stamp of choice with the Lift Out Inkpad as you would with any other Inkpad and stamp onto the prepared and dry Alcohol Ink background. Lift off after a few seconds which will have allowed the Inkpad to do its work. Do not waste what you have lifted from the background stamp it onto a spare piece of card or into a journal. Two for the price of one, that can't be bad can it ?? 


The next photo is from the Sacred Set using the same technique but a different colourway.


For another look you can also use Versamark and White Embossing Powder on the Heavyweight Yupo but add the heat in short bursts as because the Yupo is basically a plastic paper it tends to buckle if too much heat is applied to it.


These are fairly quick and addictive techniques but very effective, I hope you have enjoyed looking today.

Love Doreen


Wednesday 8 September 2021

Beautifully Evergreen

 Welcome to Christmas inspiration in September. Today I have four samples to show you but will not bore you with ins and outs of how each of them were made. They are all fairly easy to achieve. They are all made using the fabulous Holly Script Rubber Stamp Sheet - DL.


This first sample was made using the trusty A4 Drawing Cartridgecut the card slightly larger than you want your finished topper to be. Using a Green Distress Inkpad blend the colour into your card leaving an area in the centre free of ink. Spritz with water and lift excess water off with kitchen roll. Taking a Black inkpad of choice once background is dry, stamp image onto the card. Heat set with a heat gun. then colour the Holly leaves with either paint or using a darker green inkpad to paint with, working fairly quickly add either embossing powder or glaze if you have it to the leaves and emboss with your heat gun. Next, using stickles or glitter glue of choice enhance the veins of the holly and add some lighter stickles to the stem to give the impression of light. Then add the red to the berries leave to one side to dry. Put well away from your work area as it does take a while to dry and I have many a mishap with not doing so. I used a piece of white card to matt the topper onto and a piece of red card to folded for the base. 


For this sample I chose a rustic feel using sepia tones and a piece of corrugated card for the base.


This next sample uses some odds and ends from my stash including a bauble shaped piece of mount board. Ribbon and bakers twine add a little decoration. Coloured using Distress Inkpads to paint with, also a little ink on a soft brush to add some colour to the outside edge of the bauble.


Another sample using a backing made some time ago to make a small card that uses the delightful verse that is included in this beautiful set of stamps.


Thank you for looking in today

Love Doreen


Sunday 29 August 2021

Perfectly Perched

 Perfectly Perched


The stamp used in the making of these cards is called
It is a very detailed stamp and full of potential. The first one is quite easy to make as is the second of the cards although it is a bit more fiddly if you choose to cut it out as I have.


The Bauble is made using a stencil, but if you don't have one fold a piece of paper in half and cut the shape you would like. Using a low tack tape position your bauble in place, stamp your image through the stencil, using the Distress Inkpad and a soft blending brush define the shape of your bauble. Spritz your paints with water and colour your image.
Then finally using the twig from the Owl Edges stamp sheet and the Versafine Clair Green Oasis stamp randomly around the image. 


This second card was stamped using a White Inkpad and White Embossing Powder onto Black Card. I used Iridescent Watercolour Paints to colour this piece and mounted the image after fussy cutting it onto a gold satin card with some green sheer ribbon on two of the corners. The image is mounted onto the card using a silicone glue gel. 


Thank you for looking in today

Love Doreen xx 

Wednesday 18 August 2021

Floral Delights

 Floral Delights


Today I have two samples from the last months shows, both are from the beautiful
The first of the images used is the stunning Morning Glory, such a beautiful yet delicate flower. This set has so many fabulous images (16 in total) six of the images are large and make a real statement, but the others on this stamp sheet are equally as beautiful and detailed in their own right and very useful too.
The second is an easily recognisable Cala Lily and although I would love some in the garden my hubby dislikes them with a passion, so I content myself looking at the wonderful display in my neighbours garden.


The Morning Glory was made first by using a Gelli Plate with dye inkpads and a sheet of kitchen roll applied whilst the ink was still wet, taken off fairly quickly and then using a sheet of card larger than the size needed for the finished card and take a print then set to one side to dry.
Stamp the main image onto another piece of card, then using your dye inkpads as paints colour your image.
I then tore the edges of the card and with a soft brush applied ink to the edges of the torn piece to add definition.


With the Cala Lily I stamped the image then coloured it using Inktense Pencils and a Clear Sparkle Brush Pen to blend. I stamped and coloured the dragonflies in the same way. The clear gems were added once the image was dry,


Thank you for looking in today

Love Doreen xx

Saturday 7 August 2021

Summers Day

 Summers Day


Hi everyone, here are my picks for today. Can't you just imagine looking a view just like this out of a window ? 
This was a fairly quick make to be fair. I used a cloud mask and some of my Distress Inkpads applying them with soft brushes onto some glossy card.
Next with some Versafine Clair Green inkpads and the 
 For the grasses in the foreground I just used the tops of the stamps, applying them randomly. When completely dry buff with a soft cloth to give a sheen to your finished card and although I chose not to you can easily add a sentiment of your own choice to the card.


Here is another card which uses the grasses from the Walk Tall Rubber Stamp sheet - DL
in the background to compliment the beautiful Majestic Crane Rubber Stamp sheet - DL 
Again this is a simple card to make using the Majestic Crane stamped directly onto a Pixie Powder background which work exactly the same as brushes but with added mica powder.
The card used for this make is the trusty  A4 Drawing Cartridge 220gsm - pk 10 Which is definitely my go to card in the majority of my makes. 


Well that is all from me today, I will be back again later in the month but there is a daily blogpost from the Design Team where you can see some fantastic makes from the rest of the team to inspire you.

Thank You for looking in 

Love Doreen xx

Wednesday 28 July 2021

Sitting Pretty

Sitting Pretty


Today I would like to share this make with you, it uses a stamp set called
I also used a Grey Inkpad, Watercolour Brush Pens, a Clear Glitter Gel Brush Pen and one of my Make Art inkpads Garden Patina which I used to colour the background and the mermaids spotlight bubble.

Another card made using the Mermaid Queen set and the very versatile and much loved
I used the worker stamps in the Mermaid Queen stamp set, a mop up background on glossy card, the stamped images were embossed using a clear embossing powder.
The bubbles from the Make Your Mark set I feel set the scene on the backing card for the finished topper.


Thank you for looking in today

Love Doreen